

Compression… your best friend and your worst enemy.
When used correctly, compression is a key ingredient for vocals that sound professional, modern and radio-ready.
When used incorrectly, compression can quickly ruin a good vocal recording and make your music sound amateur and over-processed.
By the end of this guide you will be able apply vocal compression with confidence to craft vocals that sound modern and are easy to mix.
We’re going to cover tonal compression, dynamic compression, limiting, multiband compression, side chain compression, parallel compression and more.
I’m guessing you’re here because you want to make your mixes sound professional. We put together a brief training that covers a totally new approach to music production. Until now, everyone has been teaching production totally backward. Just click below to watch.Get industry-quality every time (steal this framework)
But if you just want to learn about compressing vocals specifically, keep reading.
Before You Load Up a Vocal Compressor…
It’s important to have an understanding of what you are trying to achieve with compression. As with any mixing process, you should have a purpose behind every plugin and decision.
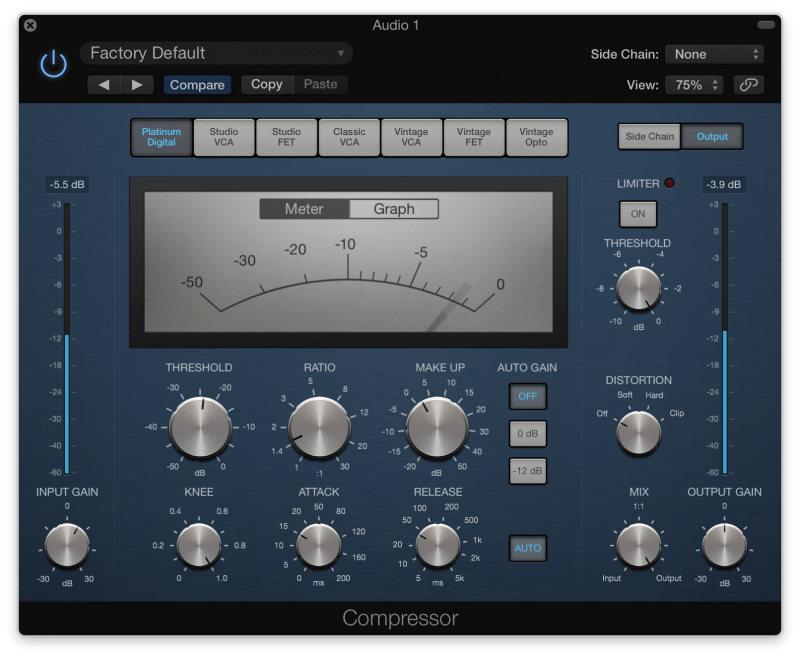
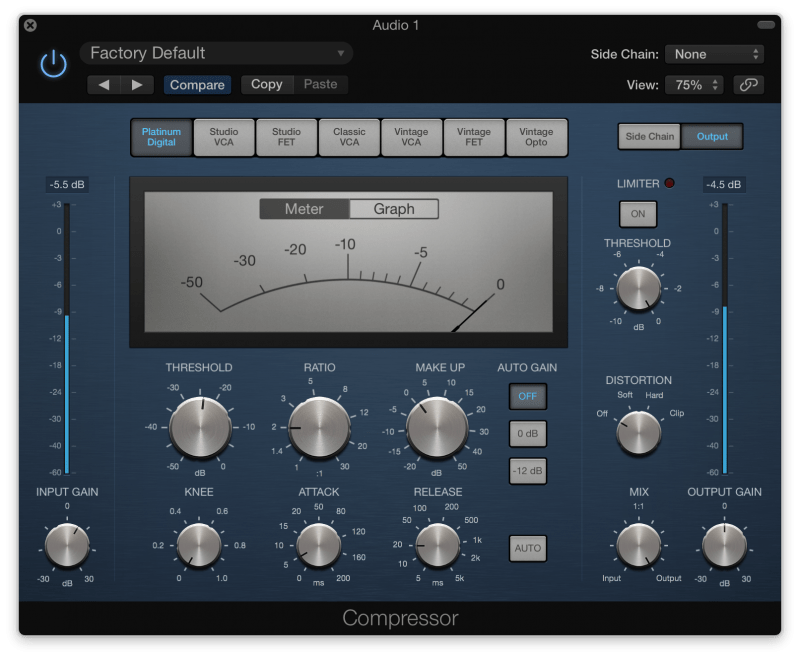
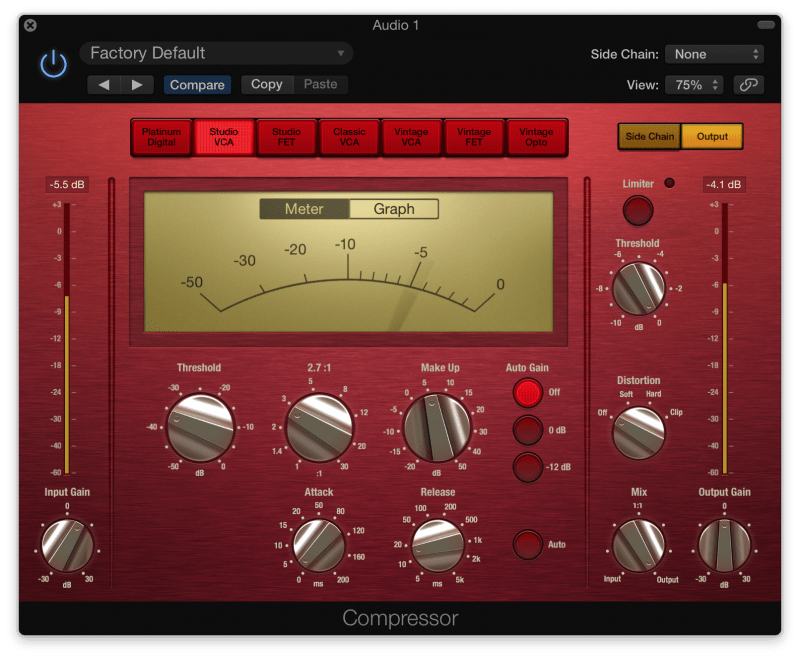
It’s also important to have an understanding of how a compressor works. Let’s look at the anatomy of a compressor:
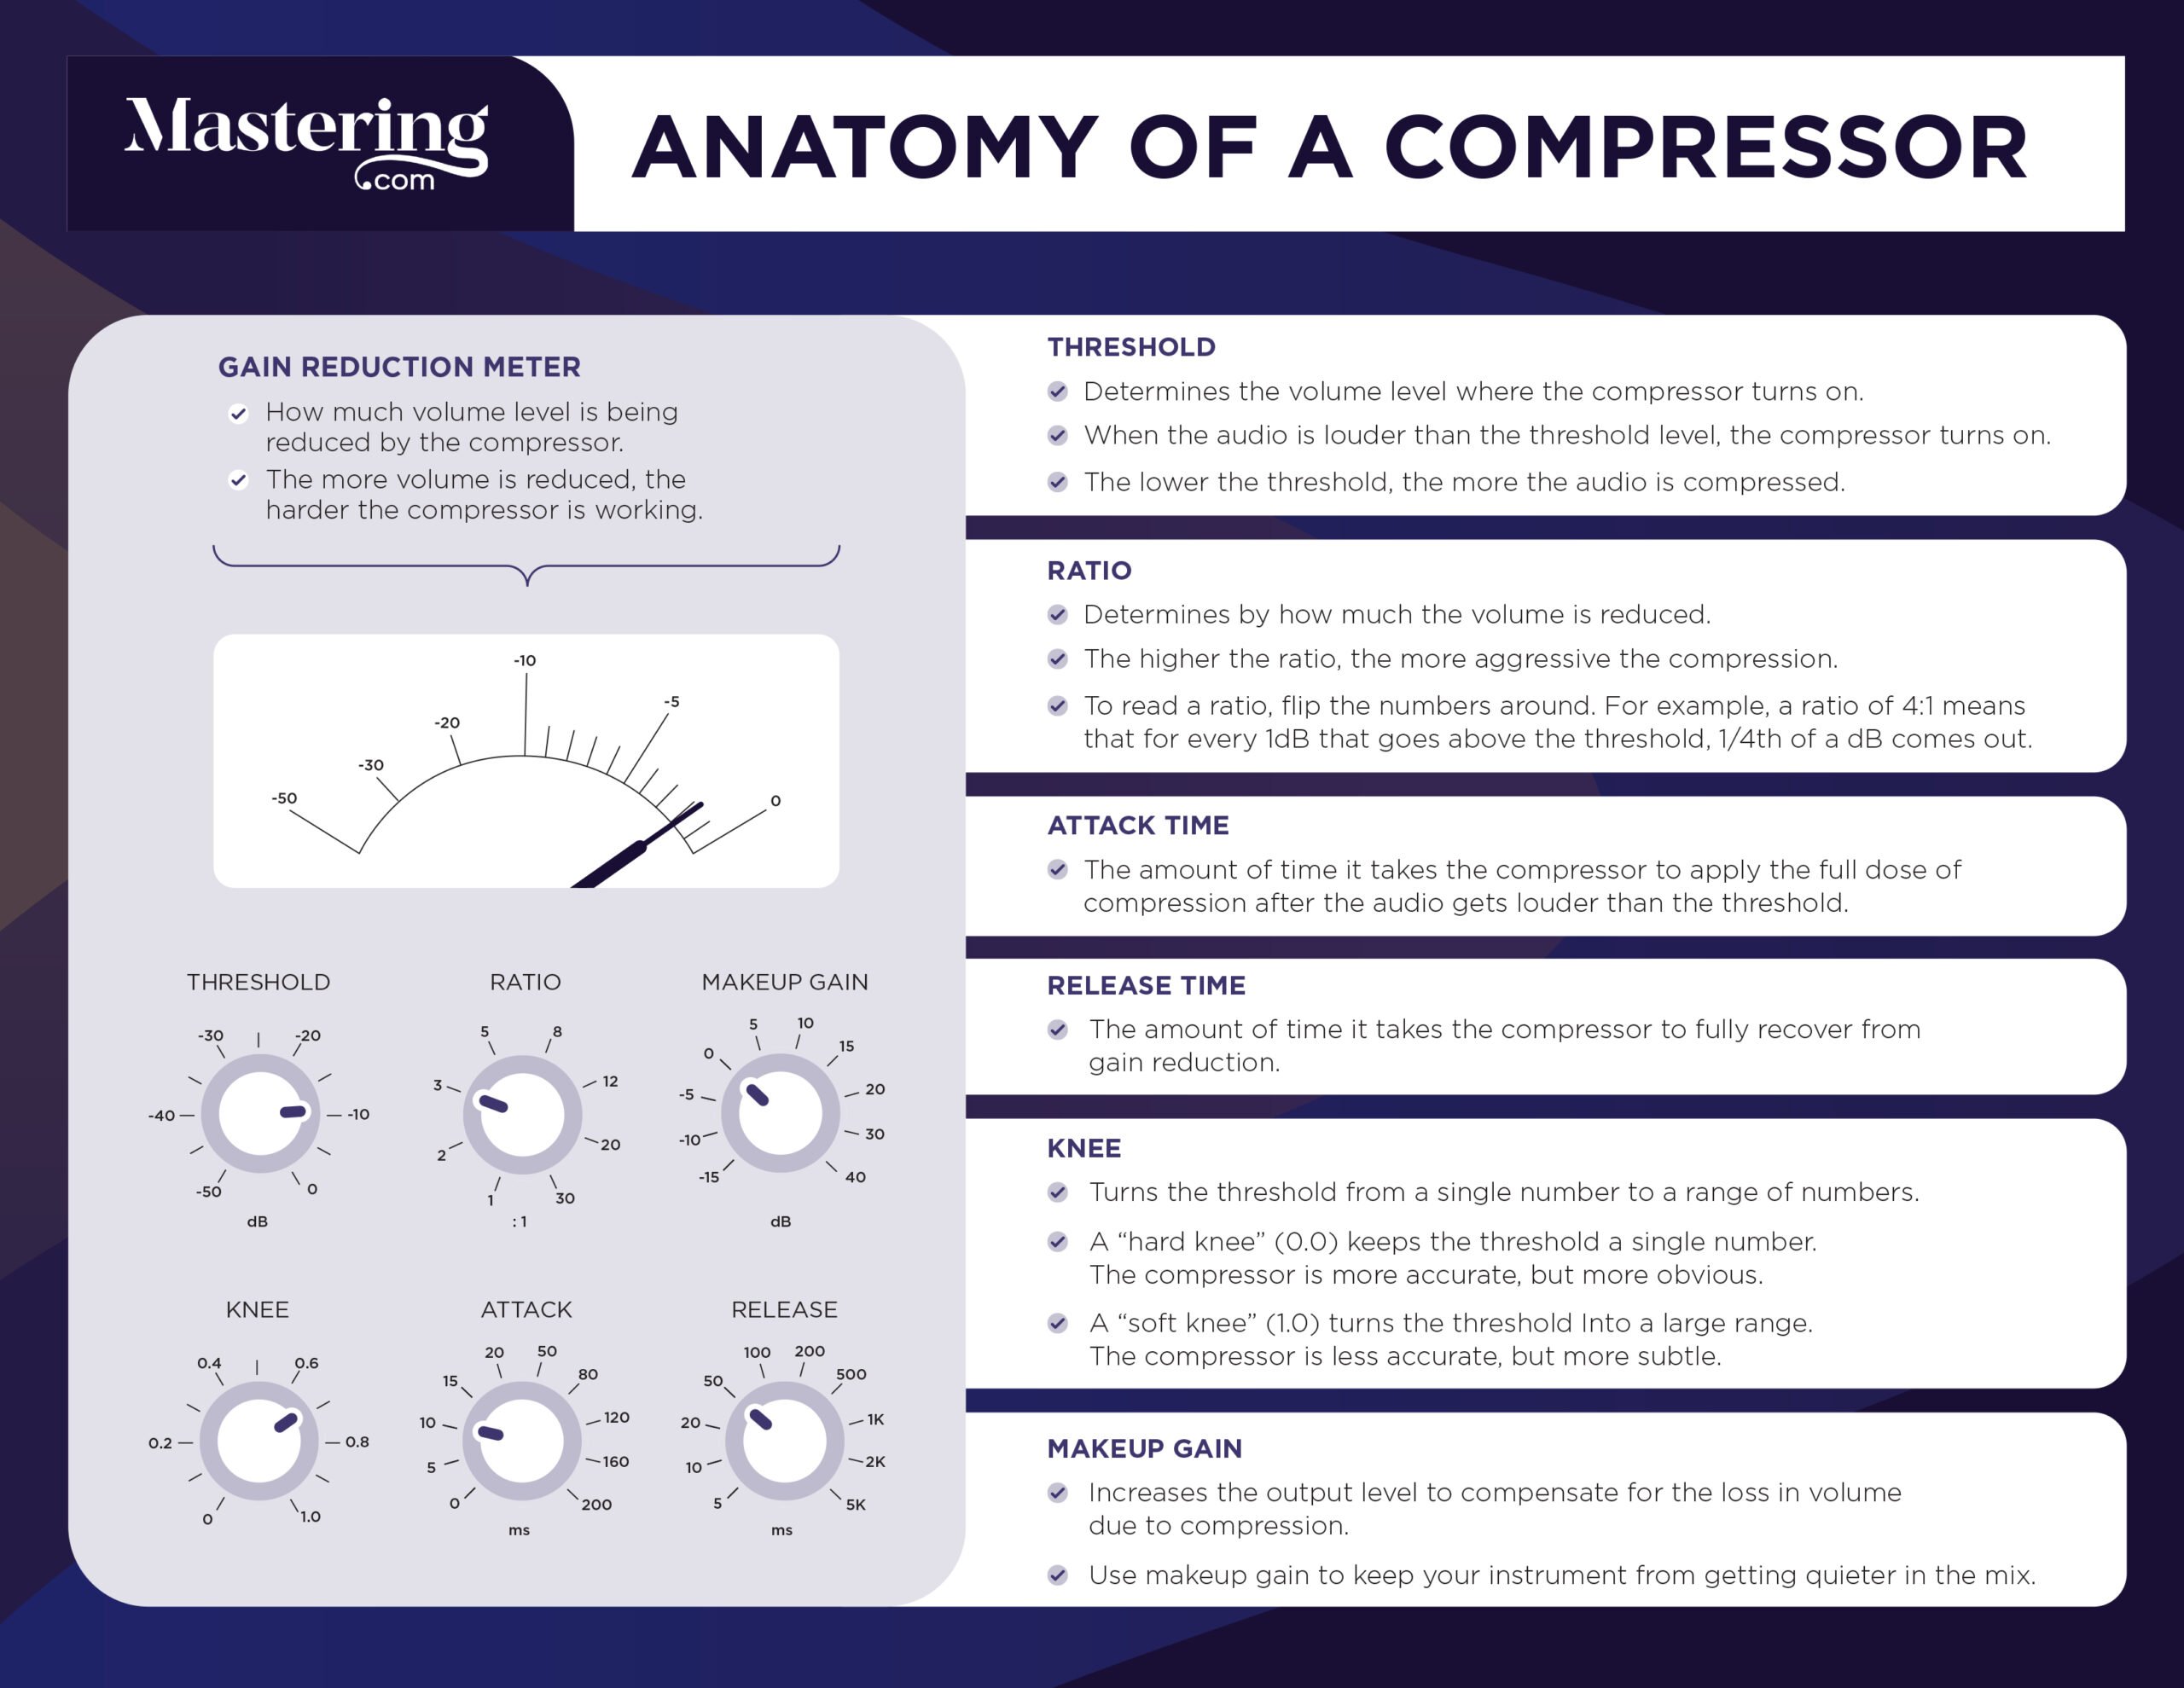
One of your aims when mixing vocals is to make them as dynamically consistent as possible. They need to sit on top of the mix at all times. Every word should be clearly audible, and every word should be a similar volume.
Modern standards of professional production require crazy levels of perfection and consistency in the vocal. It might seem like this would sound unnatural, but it doesn’t.
You do this with automation, NOT compression.
You do this with automation, NOT compression.
That’s not a typo. I wanted you to read that twice so you really take it in.
You may be wondering, then, “why is compression so important on a lead vocal?”
There are two main reasons:
- To add EVEN MORE dynamic control
- To shape and enhance the tone of the vocal
In most cases, the genre will require you do both of these things. For some genres, though, you may only need to do one or the other.
It’s important that you consider the style and vibe of the track before you apply compression. Here are some basic vocal mixing guidelines to get you started:
- Pop, R’n’B, Electronic: These styles share similar traits. In general, heavy processing is acceptable and often required. Lots of top-end shimmer, noticeable effects, and highly consistent dynamics are the norm.
- Hip Hop: Similar to Pop, but with fewer effects and less top-end. More presence and aggression in the upper mids. (Though the most mainstream of Hip Hop often has top-end shimmer more akin to Pop).
- Rock: Less top-end, more body, and high mids. Vocals can sit a bit further back in the mix.
- Jazz: Approach with subtlety and taste. Avoid obvious processing and leave the dynamics mostly intact.
- Hardcore/Metal: Heavy compression (several rounds of 6-10dB gain reduction can be warranted) to make the vocals sound aggressive. Check out Hardcore Music Studio for more advice on mixing hardcore music.
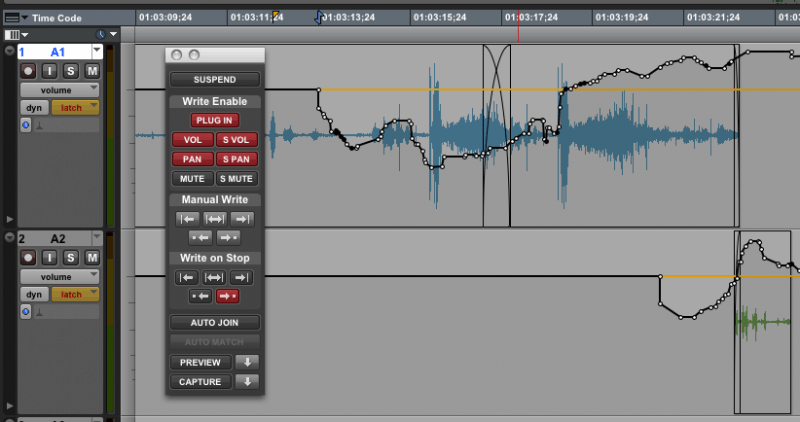
Front End Automation
Detailed automation can take some time, but it’s time well spent. Mutt Lange (AC/DC, Def Leppard, Lady Gaga, Muse, Shania Twain) has been known to spend a whole day just riding one vocal part.
Most people use basic volume automation to make the dynamics of the lead vocal consistent (the best way to do this is with a physical fader, using a control surface like the PreSonus Faderport)
But I propose an alternative – gain automation.
The key difference between ‘volume automation’ and ‘gain automation’ is that volume is at the end of the signal chain whereas gain is at the beginning of the signal chain.
This means that the vocal is dynamically consistent BEFORE it hits your vocal compressor – not after. Before the vocal touches ANYTHING else, it’s already consistent.
This takes a lot of stress off your compressors and limiters. It helps all of your plugins to perform better because the vocal will always be around that -18dBFS sweet spot.
By automating the vocal early on, we also make it a lot easier to mix. We can be more subtle with compression.
Big wins early on will increase your confidence, too, which means better mixes.
Then, later in the mix, you can use volume automation to make sure the levels are consistent with the feel of the track (for example, louder in the choruses).
Here’s a step-by-step breakdown of this great trick:
When To Use Your Vocal Compressor
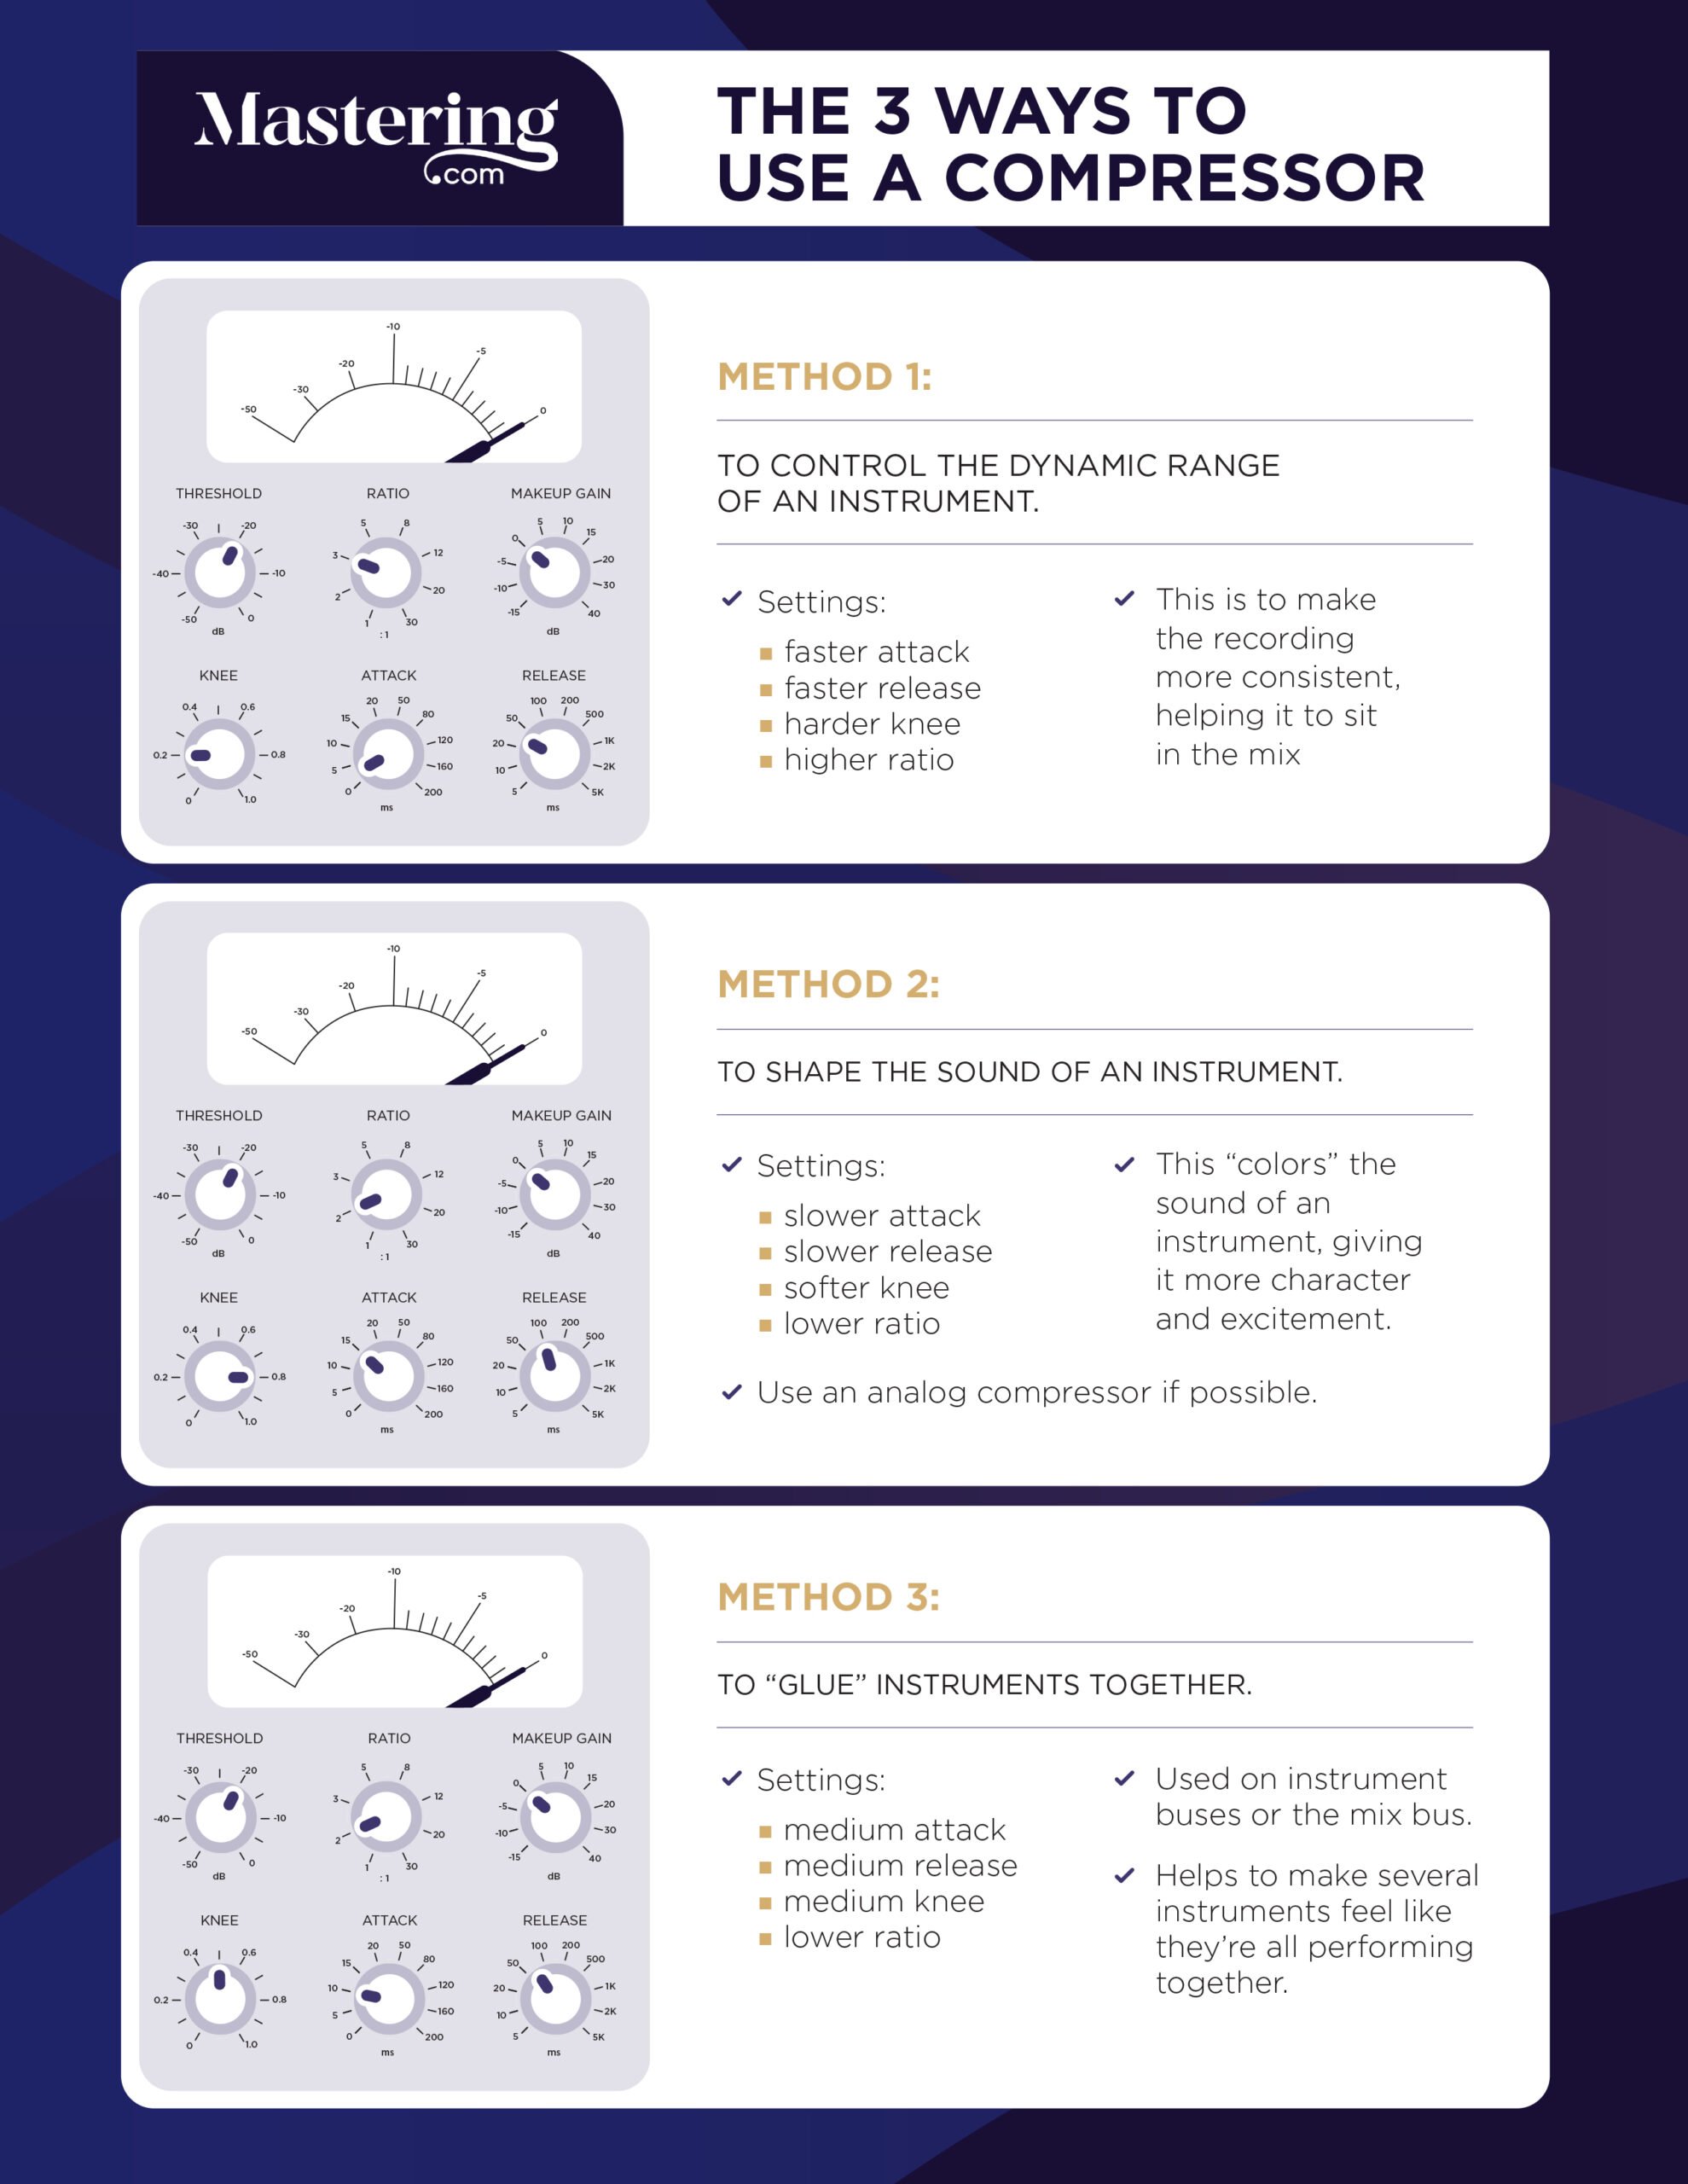
To achieve subtle, natural sounding compression on your vocal it’s best to use multiple compressors throughout the mixing process (this is called ‘serial compression’).
Rather than using one heavy compressor with a 10:1 ratio that’s applying 10+ dB of gain reduction, it’s better to use multiple compressors that each chip away at the vocal applying 2-3dB of gain reduction.
That’s why it’s good to apply light compression with outboard gear when recording if you have the equipment (don’t worry if you don’t).
For some genres, only one compressor is needed (Jazz, some Rock, Acoustic etc). But when heavy processing is necessary (Pop, Hip Hop, R’n’B, Electronic etc) it’s better to apply compression in stages.
Here is an overview of my usual mixing system for mainstream, modern vocals:
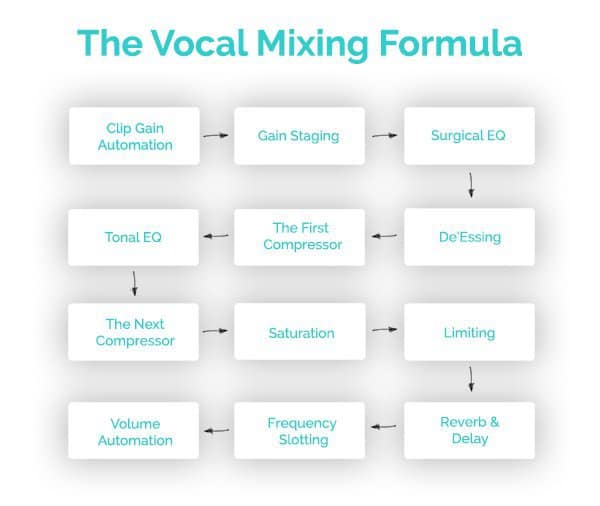
As you can see, I use compression before AND after EQ.
The first compressor uses ‘tonal compression’ to shape the tone, lightly tame the dynamics and add or remove aggression from the vocal.
The second compressor uses ‘dynamic compression’ to catch the loudest peaks and add more dynamic consistency. We can also shape the tone here too.
In a second we’ll take a look at those two different approaches in a bit more detail. But first, you need to decide on your purpose.
It’s Crucial to Have a Purpose
Think about the feel and vibe of the track before you apply compression.
What genre does it fall under? Does it require a modern, mainstream, in-your-face vocal sound like you would hear on the radio? Or does would it suit more subtle, musical compression?
How dynamic is the vocal? Does it need a lot of control, or does it already sound consistent? Do the dynamics of the song vary drastically?
How is the tone of the vocal? Does the vocal sound aggressive and full of energy, or does it sound boring a lifeless? Does it sound TOO aggressive for the vibe of the track?
Ask yourself these questions and come up with an idea of what you are trying to achieve with compression. Once you have a clear idea in your head, you can follow the procedures outlined in the rest of the guide to achieve your goals.
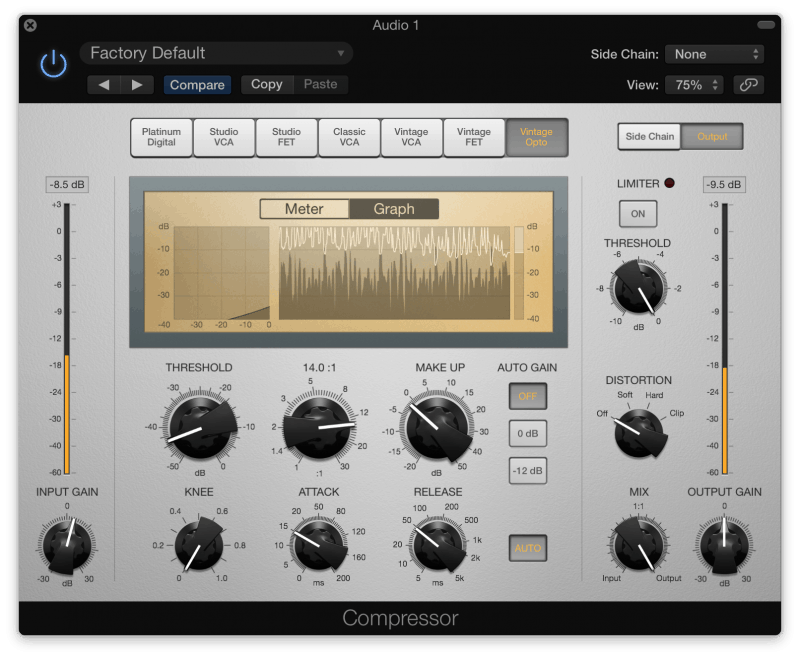
How to Use a Compressor
Before we start talking about dynamic compression and tonal compression, let’s look at how to use a compressor:
UPDATE: I also put together this waveform demonstration video, so you can see exactly what compression does to an audio source:
Once you have an understanding of how to set up your compressor, move on to one of the secret techniques of vocal mixing: Tonal Compression.
Tonal Compression
This lighter approach to compression is about shaping the tone of the vocal and adding a small amount of dynamic control just to smooth out the levels.
This approach should use quite a slow attack and release time. You don’t want to compress the transients too much, as this will push the vocals further back in the mix.
Adjust the threshold so that the compressor is engaging on almost every word, but then use a low ratio to make sure you are only applying 2-3dB of gain reduction.
This is how to compress vocals using a lighter, more musical approach:
- First of all, load up a compressor. Any will do.
- Next, lower the threshold and raise the ratio to extreme settings. This allows you to clearly hear the compressor working.
- Start with a medium attack time around 15ms and adjust to taste. A fast attack (5ms) will make your vocals sound thick and heavy. A slow attack (30ms) will make your vocals sound punchy and aggressive.
- Dial in a medium release time of 40ms and adjust from there. Try to get the compressor pumping in time with the music.
- Once you’ve settled on an attack and release time, bring the ratio down to somewhere around 1.5:1 and the threshold back up to around -24dB.
- Finally, adjust the threshold and ratio until you are averaging 2-3dB of gain reduction (or higher for heavier music).
The main parameter that dictates the tone of the vocal is the attack time. Spend plenty of time tuning that in, and adjust it in the mix after you have set the compressor.
You could also try using a fast release time, or even setting it to as fast as it can go. This makes the vocals sound loud and aggressive. My good friend Jason Moss explains this well in this video.
Most of the time, though, it’s best to use a slower release time and adjust the timing until the compressor seems to breathe with the tempo of the track.
Remember, this approach to compression is about shaping the tone of the vocal, so try a few different compressors and compressor types if you have them.
Spend plenty of time adjusting the attack and release time until you are happy with the vocal. Use a fast attack time for thick, heavy vocals and a slow attack time for punchy, aggressive vocals.
I also recommend using a soft knee compressor for this approach if possible (just turn up the knee parameter if your compressor has one). This sounds more natural and musical. You don’t need a hard knee for dynamic control here.
How to Get Light Tonal Compression
Here are my go-to compression settings for vocals:
- Ratio: 1.5:1
- Attack Time: 15ms (but up to 30ms for more punch)
- Release Time: 40ms
- Threshold: -24dB
- Gain Reduction: 2-3dB
- Knee: Soft
- Makeup Gain: 2dB
Remember that these settings are only a starting point. A lot of tweaking will be needed, and sometimes you may have to use completely different settings. But this is what I start with 80% of the time.
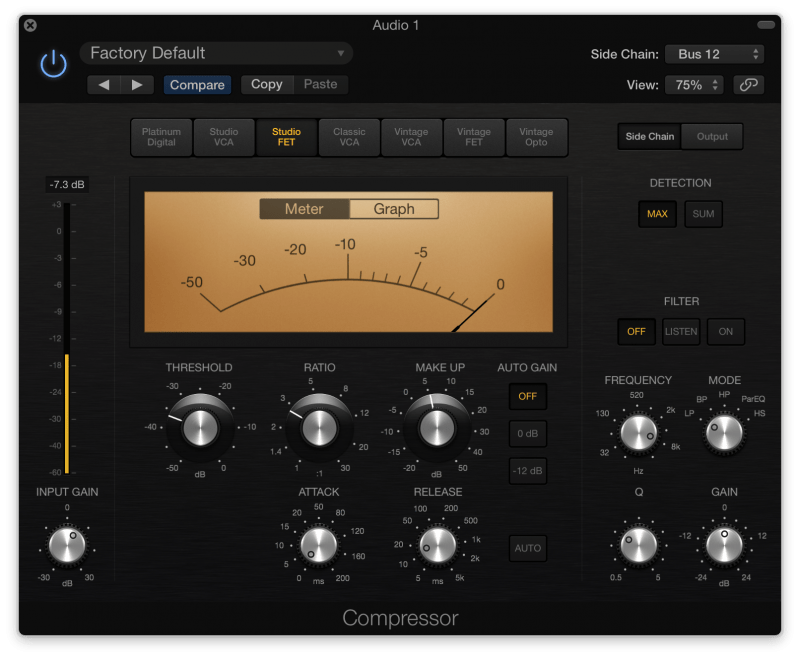
Dynamic Compression
This approach to compression is about catching the louder peaks and reducing their volume. For lighter genres, this type of compression might not be appropriate.
To do this, a faster attack time and higher ratio are needed.
As we are only trying to catch the louder peaks, a higher threshold is also needed. You don’t want to compress every word (like with tonal compression), you only want to compress the louder peaks.
You still need to be careful not to compress the transients too much, as this will put the vocals further back in the mix. Use a faster attack time, but try not to go below 1ms.
Adjust the release time so that the compressor breathes with the music, or use a fast release time for more loudness and aggression.
This time, the process is slightly different:
- Load up a compressor (any will do).
- Set the ratio to 10:1 (and the knee to ‘hard’).
- Adjust the threshold until the compressor is only engaging on the louder peaks, not every word.
- Start with a medium-fast attack time of around 3-10ms. You can try using a slower attack time for more aggression, or a faster attack time for more weight (but don’t go too far below 2ms as you will put the vocal further back in the mix).
- Set the release time to 20ms and adjust until the compressor is breathing in time with the music. Try using a fast attack time for more aggression.
- Lower the ratio to somewhere around 2:1 until the compressor is applying 2-3dB of gain reduction (or 6-10dB for heavier genres).
How to Get Great Dynamic Compression
- Ratio: 2:1
- Attack Time: 5ms (medium-fast)
- Release Time: 20ms (medium)
- Threshold: -24dB
- Gain Reduction: 2-3dB
- Knee: Hard
- Makeup Gain: 1dB
Combining Tonal and Dynamic Compression
These two approaches work best when combined. As I mentioned earlier, compression sounds more musical and natural when applied in several stages (serial compression).
For lighter genres where little compression is needed, tonal compression is more appropriate. But for other genres where heavy processing is needed, apply both tonal compression and dynamic compression with two different plugins (or hardware units).
I rarely use dynamic compression on its own for vocals (as it’s normally used in combination with tonal compression), but I often use tonal compression on its own for lighter genres.
Here is my go-to plugin chain for a mainstream vocal track:
- Light tonal compression when tracking
- Surgical EQ
- Tonal compression (slower attack, lower ratio, lower threshold)
- Tonal EQ
- Dynamic compression (faster attack, higher ratio, higher threshold)
You can also experiment with using the faster dynamic compressor BEFORE the slower tonal compressor. This means that your slower compressor isn’t thrown off by any loud peaks, as the fast compressor will catch them first.
My buddy Justin Coletti from SonicScoop explains this well in his video on serial compression.
NOTE: Always experiment with plugin order. Depending on what you are trying to achieve, applying plugins in a different order can make a big difference to the sound.
Best Compressors for Vocals
Let me make something clear…
The stock plugins that come with your DAW are INCREDIBLE.
Don’t buy plugins until you really see the need for better plugins.
If your mixes don’t sound as good as you would like, and you are blaming stock plugins – you aren’t ready to upgrade yet.
But when you are ready, I have a few favorite compressors for vocals.
- FabFilter Pro-C 2 – An incredible compressor that is versatile and always sounds great.
- Waves Renaissance Vocals – This plugin just has one control and it’s AWESOME.
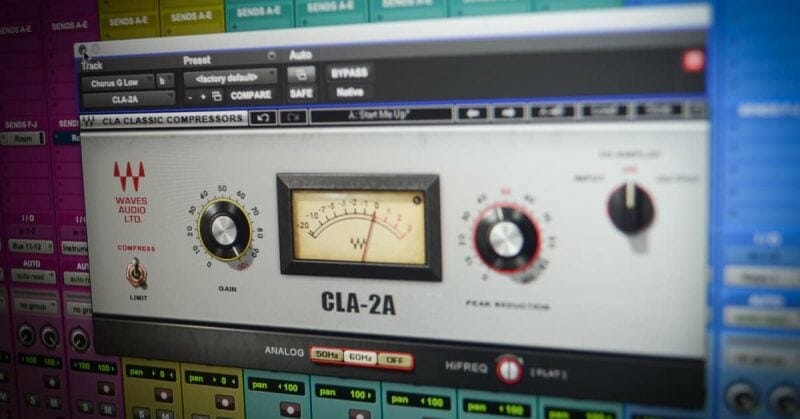
- Waves CLA2A – Any LA2A emulation is perfect for lighter tonal compression.
- Slate VMR – I like to use the 1176 emulation included in this plugin for faster dynamic control when needed.
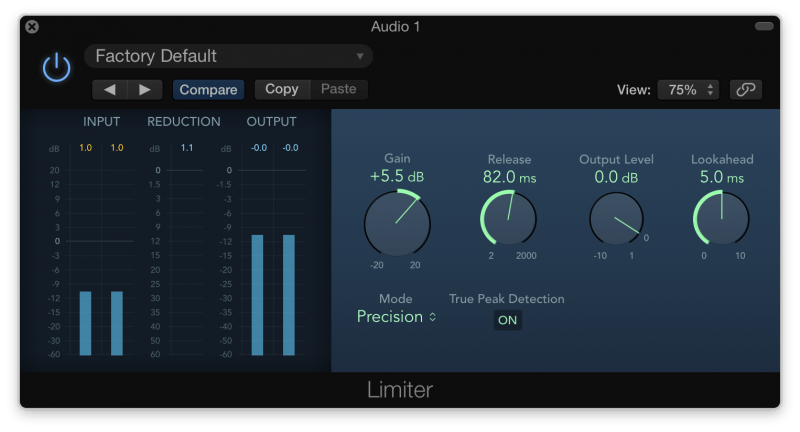
Using a Limiter
After applying automation, tonal compression AND dynamic compression, the vocal should be pretty consistent in volume.
But for mainstream styles, you can go one step further and apply a limiter to catch any peaks that slip through your compressors.
Be subtle with limiting. As little as 1-2dB of gain reduction is sufficient in most cases, and you only want to affect the very loudest peaks.
For heavier styles or dense mixes, you can experiment with more aggressive limiting to squeeze more volume out of the vocal.
Start with a fast attack time of 2ms and a medium release time of 80ms and go from there.
Sibilance Sucks… Seriously
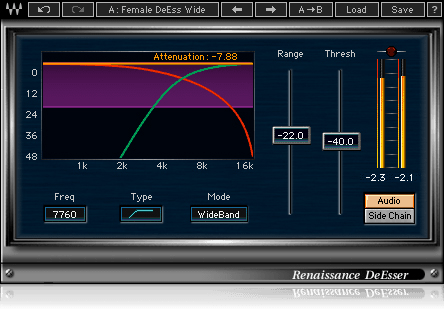
Although you can remove some sibilance with EQ, it’s better to use a de-esser.
Most vocalists will require some degree of de-essing. Not all will, though, so this step is optional.
If you record with a dynamic microphone, sibilance probably won’t be an issue. If you reduced sibilance during the recording phase by placing the mic off axis, a de-esser might not be necessary.
De-essing is better than cutting sibilance with EQ as it will only have an effect when the vocalist says words that contain ‘S’ sounds.
Rather than cutting frequencies out the entire vocal, a de-esser uses multiband compression to limit the volume of those ‘s’ sounds. By compressing a targeted frequency range (usually a small range somewhere between 4-7kHz), those frequencies can never rise above a certain volume (as the de-esser will compress them when they start to take off).
Sometimes using a multiband compressor to create your own de-esser is more effective and gives you more control.
If you have a particularly sibilant vocalist, it’s worth going through the track and manually reducing the levels of sibilant words with clip gain.
Try inserting a de-esser early in the plugin chain. Later in the mix, experiment with moving it to the end of the plugin chain as this sometimes works better.
Powerful Parallel Compression
If you are struggling to make the vocal sit on top of the mix, or effects like reverb and delay are putting the vocal further away, you can use parallel compression to make sure the vocal sits at the very front of the mix at all times.
Here is the step-by-step process for applying parallel compression:
- Create a new aux track. Load up a compressor and send your lead vocal to this new aux. Change it’s output to the ‘Lead Vocals’ aux.
- Dial in some heavy compression (aim for 6 dB’s of gain reduction or more). Start with an attack time of 5ms and a release of 30ms and go from there.
- Bring up the new aux underneath the lead vocal until it starts to increase the volume of the vocal. As soon as you notice an increase in apparent volume, stop. That should be enough.
- You can push it even further than that if you want – it depends on the style of music.
This is a form of upward compression. With normal compression (downward compression), you make the peaks quieter and then increase the overall volume of the track. But with upward compression, you’re making the quietest bits louder.
This means that your vocal will never drop below a certain volume.
It’s more time consuming, but it gives you a lot more control over the amount of compression.
Here are some general tips for using parallel compression:
- It can sound more subtle than applying compression directly to the main vocal – great for lighter genres. Just keep the volume low.
- It gives you a lot more control over the amount of compression. You can make extremely subtle changes by moving the channel fader up or down.
- Some mixers don’t use any direct compression on the lead vocal at all and ONLY use parallel compression.
- You could even add a limiter after the compressor to further control the dynamics.
- Watch out for any resonant frequencies that become apparent due to the high amount of compression. Apply EQ or multiband compression if needed.
Masterful Multiband Compression
Multiband compression isn’t the easiest thing to use. It’s easy to go from ‘adding energy and control’ to ‘completely over the top and ruined the mix’.
But by applying subtle multiband compression you can easily add energy to the vocal and effectively control specific frequency ranges.
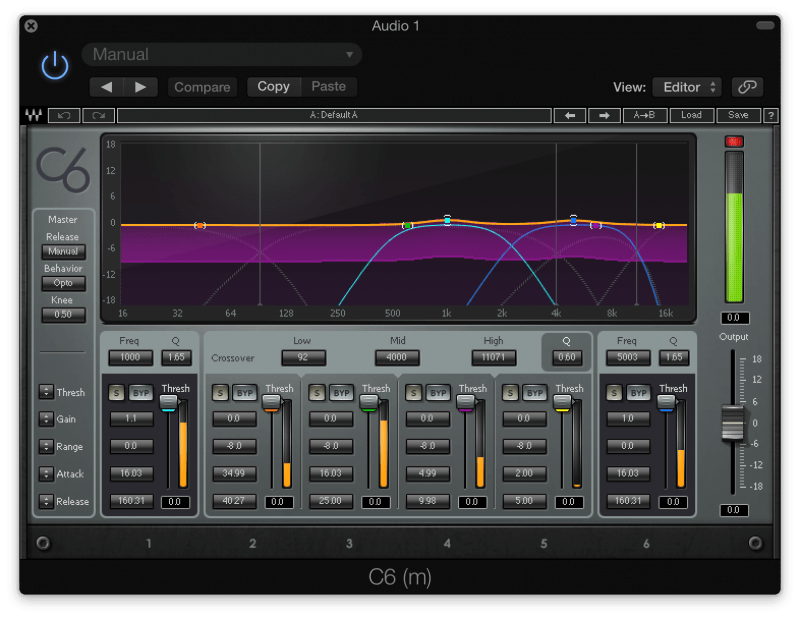
- Compress two or three wide frequency ranges individually
- Target specific frequency ranges to either enhance or reduce them
Let’s go over each technique in a bit more detail.
Wide Frequency Range
By simply adding a multiband compressor with the same compression settings over each frequency range you can add energy to the vocal.
Load up any multiband compressor and dial in 1-2dB of gain reduction on one of the bands. Copy the same settings to every other band. Experiment with moving the bands around. You might not want to compress the super high or low stuff, so try having one band compressing 100Hz-2kHz and another band compressing 2khz-10kHz using the same compression settings.
Another way to do this is to use the free OTT plugin (top of this list). Try using a depth of 10% and a time of 100%. Keep it subtle.
Targeted Frequency Range
If you’re having problems with a particular frequency range, multiband compression is sometimes better to use than EQ.
That’s why it’s better to use a de-esser (a form of multiband compression) to remove sibilance than EQ. Rather than cutting those frequencies out of the whole vocal with EQ, you are just taming those frequencies when they appear with targeted multiband compression.
Here are a few ways that you could use multiband compression to control specific frequency ranges:
- Create your own de-esser by targeting the sibilant frequencies (this varies between singers but is usually somewhere between 4-7kHz)
- Tame room resonances with multiband compression rather than cutting them with surgical EQ (especially if the resonances only appear when the vocalist starts singing loudly)
- Apply a broad compression band from 3-5kHz to reduce harshness
- If the vocalist sounds nasal on some words, find the guilty frequencies and target them (somewhere around 800Hz to 1kHz)
- To compress the lows and bring them up so that they’re always present (to add thickness and warmth)
- Approach multiband compression in a similar way to EQ. Think about how you would like to increase or decrease different elements and emotions of the vocal.
You can increase elements by compressing them with a band and then increasing the gain. You can decrease elements by compressing them and then not bringing the gain back up.
Try adjusting the tone of the voice with multiband compression instead of EQ. Some words sound different to others, and this is a great alternative to using EQ automation (it’s much faster, too).
Super Sidechain Compression
If there are instruments battling the vocal for space in the mix, you can use sidechain compression to get them out the way.
Applying sidechain compression to guitars, pianos or other midrange instruments is a quick and easy way to create space for the vocals.
You can even sidechain everything to the vocals for a quick and easy fix.
Create a new aux channel called ‘Instruments’. Send everything but the lead vocal aux to this new stereo channel.
Load up a compressor on this new ‘Instruments’ aux and sidechain it to the lead vocal. This provides instant space for the vocal when it needs it (just make sure to keep it subtle with less than 1dB of gain reduction).
How to Compress Backing Vocals
Your main aim with the backing vocals is to make them surround and complement the lead vocal.
To make them sit further back in the mix, try applying fast compression with an attack time of 1ms or less. This will squash the transients, so the backing vocals won’t sound as aggressive.
You can be more heavy-handed with backing vocals in general, and in most cases, it’s easier to simply apply one compressor with 5-10dB of gain reduction.
If you want to dig deeper into music production and learn what it actually takes to make mixes that sound pro… And you’re an intermediate or advanced producer… Be sure to check out the free masterclass: Enjoy!Next Steps


